
Input Manager Tutorial and Examples
The Input Manager script allows you to change keyboard mappings with scripting in Unity 3D. This quick start guide will show you the basics on how to implement the Input Manager into your game and get started immediately. For a brief explanation of InputManager's public interface functions take a look at the Input Manager scripting references
Note: InputManager has undergone an update. Some or all of this tutorial may be depreciated. An update is forthcoming.
Note: InputManager has undergone an update. Some or all of this tutorial may be depreciated. An update is forthcoming.
Installation:
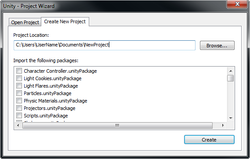
Create a new Unity3D project
To get started with the InputManager it is usually a good idea to create a fresh Unity3D project so that you can make as many tests as you need without cluttering up your already existing projects. It's also a good idea to set a goal for what you want to accomplish.
Today we will be creating a little game with a "capsule character" walking around with some GUI scripting that lets the player change what keys are used to move the player around. We're also going to take a look at how to change the default keys for your game, and how to save the players' key bind choices to either an XML file that the user can configure in a text editor if need be (Always a good option that allows players that little bit of extra control over their game) or how to save those same key binds to the player preferences if you are making your game for web players and will not have access to the local hard drive. The scripting language that I will be using in this tutorial is C# for no particular reason other than it's what I'm used to after my history of learning C++ as my first language. If you're more comfortable with Javascript (yes I know it's really "UnityScript") then go ahead and convert these over to Java and you should be fine.
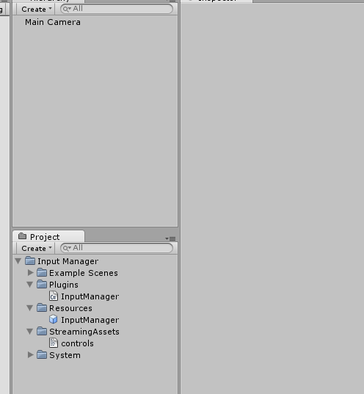
After you have created the empty project, import the Input Manager package into it. Your project panel should look something like this:
Today we will be creating a little game with a "capsule character" walking around with some GUI scripting that lets the player change what keys are used to move the player around. We're also going to take a look at how to change the default keys for your game, and how to save the players' key bind choices to either an XML file that the user can configure in a text editor if need be (Always a good option that allows players that little bit of extra control over their game) or how to save those same key binds to the player preferences if you are making your game for web players and will not have access to the local hard drive. The scripting language that I will be using in this tutorial is C# for no particular reason other than it's what I'm used to after my history of learning C++ as my first language. If you're more comfortable with Javascript (yes I know it's really "UnityScript") then go ahead and convert these over to Java and you should be fine.
After you have created the empty project, import the Input Manager package into it. Your project panel should look something like this:
Import the InputManager package
If your project pane looks different, either you have a newer version than the current version at the time of writing this or there might have been a slight problem during the import process. It's always a good idea to make sure that everything is in order before you start changing things, and it becomes hard to tell what change you did that caused the problem.
Creating the scene
Once you're sure that everything is setup okay and that nothing is going to explode your eyebrows away it's time to start cracking; Either load up the "Character Controller Example" scene in the Example Scenes folder or create your own scene with a new plane GameObject centered at (0, 0, 0) a new directional light with rotation (50, 0, 0) and move the main camera to around (0, 8, -10) and rotation (44, 0, 0). The example scenery has a few more objects included in it but they're not crucial for what we're about to do.
Now that we have an area for our character to move around in, create a capsule to represent our player in the game world:
Now that we have an area for our character to move around in, create a capsule to represent our player in the game world:

Create a primitive capsule
Adding the character controller
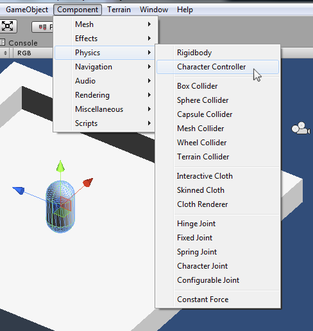
Add a Character Controller to the Capsule
Left click on the capsule and click Component->Physics->Character Controller if Unity asks if you want to replace a CapsuleCollider, click "Replace"
If you don't have much experience with Unity: A Character Controller is a way to easily move objects (Usually characters modeled after people) around and be assured that the CharacterController is going to take care of all of the collision for you. There are several options that you can see in the Inspector for the Controller, and if you've never used one before now would be a good time to take a look at them, however the default values should be fine for the purposes of this tutorial and there's no reason to change them.
Next, in order to make our Capsule guy (or gal) move around we need a script to handle Input, and to send messages to our Character Controller to move us around; Create a new C# script and call it PlayerCharacter. If you're expecting to use any Javascript files in your game you should usually put all of your C# scripts into a folder called Plugins. Even if you don't plan on using Javascript doing this can save you some issues down the road. As a relevant note: If you're having issues accessing InputManager from .js files, try moving InputManager.cs into the Plugins folder and see if that fixes anything.
Once you have your PlayerCharacter script created, open it up and paste the following code into it:
using UnityEngine;
using System.Collections;

public class PlayerCharacter : MonoBehaviour
{
	public CharacterController myController;
	Vector3 moveDir = Vector3.zero;
	public float moveSpeed = 2.5f;

	// Use this for initialization
	void Start ()
	{
		//Cache a reference for performance
		myController = GetComponent<CharacterController>();
	}

	// Update is called once per frame
	void Update()
	{
		//Set the direction of movement
		moveDir.x = InputManager.GetAxis("Horizontal");
		moveDir.z = InputManager.GetAxis("Vertical");
		//Makes sure that movement is always along the ground
		moveDir.y = 0;

		moveDir = moveDir.normalized * moveSpeed * Time.deltaTime;

		//Tell the character to move
		myController.Move(moveDir);
	}
}
Save PlayerCharacter and test your game. If you see any Debug messages in the console log about the InputManager complaining that "No known axis of name XYZ" just ignore that for now, we'll handle that in a minute.
In the game view you should see the capsule move around with the W A S D keys and also the arrows keys. If you have any walls in your scene you'll notice that the character collides with them as you would expect. This is the CharacterController making our lives' easier. However; you'll notice that the character doesn't fall off the edge if you walk over nothing. This is because we haven't put any gravity in, yet but I'll leave that for a bit later.
If we wanted to let the player change which keys they press to make the character move we might want to add a little GUI menu where they click on a button depicting which control they wish to change and then the next button pressed is assigned to that control.
To accomplish this; we're going to make use of a InputManager function called WaitForKeyPress and the setKeyBind function. Copy paste the following code anywhere in your PlayerCharacter object:
	bool settingKey;
	IEnumerator waitForBindInput(string bindName)
	{
		yield return StartCoroutine( InputManager.WaitForKeyPress( 2.0f ) );

		InputManager.setKeybind(bindName, InputManager.lastKeyPressed);
		settingKey = false;
	}

	//Display graphical user interface
	void OnGUI()
	{
		if(GUILayout.Button("Set Forward") && !settingKey)
		{
			settingKey = true;
			StartCoroutine( waitForBindInput("Forward") );
		}
		GUILayout.Label( InputManager.getBoundtoKey("Forward").ToString() );
	}
If you want to, you can copy paste the OnGUI code and change out Forward with: Back, Left and Right to create a full blown menu, but that's not really needed.
This may look a bit confusing for anyone who has never seen a Coroutine before, but if you do a quick search for "C# Coroutine Tutorial" you can probably find a veritable cornucopia of resources explaining how they work. However for the purposes of this tutorial it suffices to say that after the line:
This may look a bit confusing for anyone who has never seen a Coroutine before, but if you do a quick search for "C# Coroutine Tutorial" you can probably find a veritable cornucopia of resources explaining how they work. However for the purposes of this tutorial it suffices to say that after the line:
//This will timeout after two seconds
yield return StartCoroutine( InputManager.WaitForKeyPress( 2.0f ) );
No more code from waitForBindInput will be executed and the value returned from this function will be stored in InputManager.lastKeyPressed. The float value that we're passing to the function is a "timeout" period, after that time the function will quit and KeyCode.None will be returned. If you want the function to never timeout just simply do not pass a value at all. For example:
//This will never timeout
yield return StartCoroutine( InputManager.WaitForKeyPress( ) );
Even though the execution of waitForBindInput is frozen until WaitForKeyPress is finished; OnGUI() will still be called a couple of times every frame and that's why we have the bool settingKey to check if we're still waiting for a key to be pressed. If you click on a button and then click again, you will see it set the key bind to Mouse0 but the button will ignore being clicked because !settingKey evaluated to false.
If you haven't already; Save PlayerCharacter and test the game, notice how when you change which key Forward is bound to that the character will not move with the old key but will instead move when the new key is pressed. Also notice that InputManager lets you bind two controls to the same key.
If you don't want duplicate keys you will have to handle that by first checking for them with the InputManager's getDuplicateBinds function. Similarly you would find controls that are bound to no keys through the getUnboundKeys function. However those subjects are for a later time.
Setting up the default Controls for your game
Taking a look at the InputManager prefab
You may have noticed by now that we never actually setup the default controls for our game. You may have also noticed that InputManager inherits from MonoBehaviour and we never added a GameObject using it to the scene. If you're especially astute you'll notice that InputManager actually adds itself to the scene the first time that you call any of it's functions. This is why you're getting messages telling you that an axis doesn't exist the first time you ask for it and then after that it's fine. However; I held off talking about this to point out the fact that InputManager really is a drag and drop script so that you can start as quickly as possible on a new game without having to worry too much about setting it up until later.
However; if we want to change the default controls for our game we're going to have to get our hands a little dirty. As it is, the default controls for InputManager are defined in script near the top of InputManager.cs but changing the controls there is not the best way to do so! In fact it gives you much much more flexibility if you instead create a new prefab named InputManager (Spelling and capitalization is important) and place it in a folder named Resources. Thankfully for us, there is already a prefab setup in such a folder.
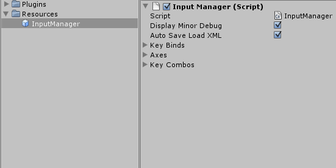
If you click on the InputManager prefab and drop down the menus inside you can see what has been going on under the hood: The Key Binds menu holds an array of named Objects that you can change the KeyCodes they correspond to by clicking the names next to boundToKey and alternateKey. The names of these objects is how you will access the key binds of your game through script. For example; see our previous scenario when we changed the key a control was bound to.
However; if we want to change the default controls for our game we're going to have to get our hands a little dirty. As it is, the default controls for InputManager are defined in script near the top of InputManager.cs but changing the controls there is not the best way to do so! In fact it gives you much much more flexibility if you instead create a new prefab named InputManager (Spelling and capitalization is important) and place it in a folder named Resources. Thankfully for us, there is already a prefab setup in such a folder.
If you click on the InputManager prefab and drop down the menus inside you can see what has been going on under the hood: The Key Binds menu holds an array of named Objects that you can change the KeyCodes they correspond to by clicking the names next to boundToKey and alternateKey. The names of these objects is how you will access the key binds of your game through script. For example; see our previous scenario when we changed the key a control was bound to.
InputManager.setKeybind("Forward", KeyCode.W );
This would change the keyBind named Forward (case sensitive) to the W key. Under the "axes" menu you will see a number of named Objects referencing the keyBinds through their names. Axes are also accessed through the names set here as, for example; Our previous usage to control our character:
//Set the direction of movement
moveDir.x = InputManager.GetAxis("Horizontal");
moveDir.z = InputManager.GetAxis("Vertical");
There is also a menu "Key Combos" which governs another set of Objects in charge of detecting when a set number of keys or controls are all being pressed at the same time. An example of when other programs use a similar process is when Control+Z triggers an "Undo" event or when in a real time strategy game Control+1 assigns the currently selected units to belong to control group 1. As a side note: It's not wise to try Control+Z as a Key Combo while testing because Unity tends to catch it and greedily interprets it for itself. (messing up your scene) I'm sure there is a way to prevent this but the functionality of Key Combinations is beyond the scope of this tutorial at the moment. However; it's good to know that it's there.
Once you're familiar with the interface for the InputManager: Drag the InputManager prefab from the project pane into the "Hierarchy" tab to add it to the scene. Even though this is not necessary it is still recommended to do so. Whenever you need to change the default controls for your game; click on the InputManager prefab in the project pane so that it will remain consistent no matter what scene you're currently working on. (If you change the one in the scene you'll have to click the apply button for it to take effect over the rest of the game)
Next for our game in progress; Add a new keyBind by increasing the "Size" property under the Key Binds menu and change the last element in the new list so that it's named Jump, and is bound to KeyCode.Space and alternate key set to KeyCode.None.
Then change the PlayerCharacter.cs script so that it looks like this: (New parts in bold)
using UnityEngine;
using System.Collections;

public class PlayerCharacter : MonoBehaviour
{
	public CharacterController myController;
	Vector3 moveDir = Vector3.zero;
	public float moveSpeed = 2.5f;

	public CollisionFlags flags;
	public float jumpSpeed = 0.0f;

        bool settingKey;
	IEnumerator waitForBindInput(string bindName)
	{
		yield return StartCoroutine( InputManager.WaitForKeyPress( 2.0f ) );

		InputManager.setKeybind(bindName, InputManager.lastKeyPressed);
		settingKey = false;
	}

	//Display graphical user interface
	void OnGUI()
	{
		if(GUILayout.Button("Set Forward") && !settingKey)
		{
			settingKey = true;
			StartCoroutine( waitForBindInput("Forward") );
		}
		GUILayout.Label( InputManager.getBoundtoKey("Forward").ToString() );
	}

	// Use this for initialization
	void Start ()
	{
		//Cache a reference for performance
		myController = GetComponent<CharacterController>();
	}

	// Update is called once per frame
	void Update()
	{
		bool grounded = (flags & CollisionFlags.CollidedBelow) != 0;

		//Set the direction of movement
		moveDir.x = InputManager.GetAxis("Horizontal");
		moveDir.z = InputManager.GetAxis("Vertical");
		//Makes sure that movement is always along the ground
		moveDir.y = 0;

		moveDir = moveDir.normalized * moveSpeed * Time.deltaTime;


		if(grounded && InputManager.GetKeyDown("Jump") )
		{
			jumpSpeed = moveSpeed;
		}
		else
		{
			if(jumpSpeed >= -1.5f)jumpSpeed -= 1 * Time.deltaTime;
			else jumpSpeed = -2.5f;
		}

		moveDir = moveDir.normalized * moveSpeed * Time.deltaTime;

		//Tell the character to move
		myController.Move(moveDir);
	}
}
While this is obviously not the best way to implement gravity for your player character it does illustrate how InputManager would fit into the already well established Jump code that is available thanks to the Unity3D community. To give the player the option to change the jump key put this code in OnGUI() next to all the other GUI buttons we have setup:
		if(GUILayout.Button("Set Jump") && !settingKey)
		{
			settingKey = true;
			StartCoroutine( waitForBindInput("Jump") );
		}
		GUILayout.Label( InputManager.getBoundtoKey("Jump").ToString() );
And there you go! Now you can change the jump key during game run time. There are functions in the works that would make creating one of these menus not so tedious, but I wanted to actually release InputManager before working on those and then make a nice first update to the package when they're finished.
Saving information for later use
InputManager saves key binds to XML
I was saving the best for last! Hardy hardy har.
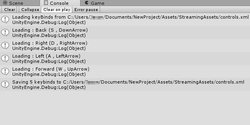
Yeah, anyway: When your player sets their key Binds they probably expect your game to remember those choices next time the game starts. Additionally it might be nice if the player could change their game's configuration without loading it up. This is why when the game starts and quits InputManager will automatically save your key bind controls to an .xml file called "controls.xml" in a folder named "StreamingAssets"
If you see InputManager complaining that it failed to load/save make sure that controls.xml is in the correct folder. Consequently, you can also change the path to look for this .xml file by changing it in InputManager's Start() and OnApplicationQuit() functions. I decided not to store this path in a global string because it would only be used about twice per game session and there's no reason for it to sit around in memory the whole time.
If the game that you're making cannot access .xml files or you just plain do not want to save to .xml there is the option to turn off automatic saving by way of the public varible InputManager.autoSaveLoadXML you can also turn off InputManager.displayMinorDebug to not see Debug.Logs telling you that InputManager is doing it's job.
Additionally you can save and load key bind information to player preference by using:
	// Use this for initialization
	void Start ()
	{
		//Load key binds from player preferences
		loadKeyBindsPref()
	}

	// Application about to quit
	void OnApplicationQuit ()
	{
		//Save key binds to player preferences
		saveKeyBindsPref()
	}
This will ensure that your game always uses the player's chosen key bindings from the last time they played.
In closing:
InputManager is capable of much more and there are other features that are currently in the works to be implemented when InputManager has been accepted into the Unity3D asset store. Newer tutorials will be added as those features make their way into the released software. But until then please contact me with any questions, suggestions or complaints you may have for InputManager or this site in general. I read every message that comes in and I'm glad for any feedback that you may have to offer.
Thank you for reading! More to come.
Thank you for reading! More to come.
